This web page was produced as an assignment for an undergraduate course at Davidson College.
An Introduction to BioPerl
Tutorial Overview
This tutorial is designed to teach those with minimal computer programming experience how to begin to utilize the immense capabilities of BioPerl. If you have never programmed before, it would be best to review some basic Perl syntax before getting started with BioPerl. Perl is a high-level programming language with easy-to-learn syntax and lots of built-in functionality. A good tutorial on basic Perl programming can be found here. Once you have learned the basics, you are ready to start using BioPerl to perform powerful bioinformatics tasks with minimal programming knowledge. This tutorial will explain the benefits of BioPerl as well as provide step-by-step installation instructions for Mac OSX users.
What is BioPerl and why should I use it?
To understand BioPerl, it is first important to understand object-oriented programming. Let's imagine that you were trying to write a program that took the reverse complement of a sequence of DNA. The easiest way to perform this task would be to assign a variable name to the DNA sequence and then write a few lines of code that reversed the order of the sequence and then swapped G's with C's and A's with T's.
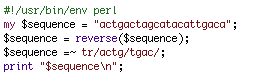
This would be an easy program to write (it is shown above), and it would serve its purpose well. However, if you wanted to reuse this program in a larger program, things might prove to be a bit more difficult than you would hope. Code would have to be copied from one program to another, and variable names would probably have to be changed. You can imagine that for more complex functions, transporting code from one program to another could be extremely time consuming. Moreover, if you wanted to reuse code that someone else had written for performing a complex function (like performing a blastn with the NCBI database) then you might spend countless hours reading through their code in order to understand how it could be transported into your program.
Object oriented programming addresses this need for modularity in computer programming. In this programming paradigm, objects define self-contained sets of data as well as manipulations that can be performed on that data. For instance, in the example given above, I could write a Perl file (sequence.pm) that, given any DNA sequence as input, would define a sequence object for that DNA sequence. I could then include functions in the sequence.pm file that manipulated the sequence object in various ways (reverse complement, GC content, etc). This type of file is called a module because of the ability to use it modularly in many different programs (.pm stands for perl module). If someone else wanted to take the reverse complement of their own DNA sequence, they could simple reference my sequence.pm module and create their own sequence object based on their specific DNA sequence. By separating data and the associated functions on that data from the implementation of those functions, object-oriented programming allows programmers to build programs modularly and avoid the unnecessary task of rewriting code. An object-oriented approach to take the reverse complement of a sequence in shown below.

At its core, BioPerl is a collection of freely available, bioinformatics-associated modules that were written by the public and assembled into a single distribution. For years, talented and dedicated programmers have written these modules, which allow the common BioPerl user to perform truly powerful operations on their data with relatively simple Perl commands. The example shown above demonstrates the reuse of the simple reverse complement function, but you could imagine that much more complex functions could be implemented with only one or two lines of code. Before you can begin using these modules, however, you have to properly install them on your computer. The next section of this tutorial describes BioPerl installation for Mac OSX. Other tutorials for installation can be found here.
Installing BioPerl for Mac OSX
Because BioPerl is a compilation of thousands of modules, it turns out to be fairly complex to install. Essentially the installation process involved putting thougsands of different text files (modules) in the appropriate directories (folders) of your computer. Your computer will look for modules in these directories when it runs a Perl program. To help in this process, a command-line based installer shell was developed called CPAN. CPAN (Comprehensive Perl Archive Network) is a tool that can be used to automate the installation of Perl. However, the use of CPAN is not trivial. Below I will explain how to install Perl onto a Mac OSX system from the command line using the CPAN shell. These instructions have been adapted from the BioPerl wiki.
Note: Some of the directories for the following installation are not openly accessible to you as a casual user of your computer, and a special command will be needed to gain access to them. If one of the given commands fails, try entering "sudo" before the command to allow that command to modify all folders on your computer.
Go to Applications->Utilities->Terminal. This is the command line application that we will use for installing BioPerl. Text to be entered in the command line will be displayed in green. Once the Terminal application is open you will see the following type of display:
somename:~somename$
Enter to following command to begin the configuration of CPAN:
perl -MCPAN -e shell
There will then appear a prompt asking whether you are ready for manual configuration, enter yes. About 10 questions will then appear to which you can simply press enter to accept the default settings. Eventually you will be asked:
Where is your gzip program? [/usr/bin/gzip]
At this point, CPAN is ensuring that you have all of the necessary programs installed on your computer to perform the BioPerl installation. Your computer will come with gzip already installed, so you can hit enter to accept the default path, shown within the brackets. However, your computer will not come with all of the necessary programs pre-installed, but that's okay because you don't need them all.
Most likely, the only program that you won't have that you will need is wget. If you get the prompt: Warning: wget not found in PATH, then you must manually install the wget program. To do this, get the free download here, and perform a manual installation. After installing wget, open a new terminal window without exiting out of the current window. Enter: which wget to find out where the install was performed. Copy this path (probably: /usr/local/bin/wget) into the first terminal window and press enter.
You can now press enter until you are prompted to select a continent to determine the nearest ftp server (file transfer protocol - the method by which the modules are downloaded from the internet). Go through and select your continent and country. You will then be asked to choose from a list of ftp's. Picking the first 3 ftp's by entering their numbers separated by spaces usually does the trick. After entering in the ftp's press enter until the configuration of CPAN is complete.
You will now be prompted with:
cpan>
which means that you are now inside the CPAN shell. You first need to update the CPAN shell. Do this by entering:
install Bundle::CPAN
You can accept the defaults for this whole installation (press enter until it is complete). At this point you have updated the CPAN installer and are almost ready to install BioPerl. However, there are 2 more programs that you must manually install first, expat and libgd. Download the latest release of each and unzip it on your computer. Open a new terminal window and navigate to the directory for the expat download. Enter the following 3 commands to perform a manual installation:
./configure
make
make install
Do the same with libgd. You are now ready to install BioPerl, which is relatively easy now that you have done all of the work to get CPAN configured.
If you are no longer in the CPAN shell (if the prompt is not cpan>), then enter cpan to open it.
Then all you have to is enter the following commands:
d /bioperl/
force install S/SE/SENDU/bioperl-1.5.2_102.tar.gz
You are done. Configuring CPAN was certainly a lot of work, but it paid off when you only had to enter two commands to install the thousands of BioPerl modules on your computer!
Where do I go from here?
Now that BioPerl has been installed, you have access to some of the most powerful bioinformatics modules that exist. You can automate BLAST searches, quickly manipulate gigabases of DNA sequence, or easily pull data off of public databases. It would be impossible to explain all of the various uses for BioPerl in a single tutorial, but luckily I don't have to. Many tutorials for using various BioPerl modules have already been written. Some of the tutorials that I found most helpful in getting started can be found here.
Briefly, though, it should be noted that to use a certain module in a program, one needs to declare the module at the beginning of the program with the "use" command (i.e. use Bio::Seq;). Once a module has been declared in a program, all of its functions as well as all functions that the module inherited are available for use. To see examples of Perl scripts that perform powerful functions with relatively simple code, you can refer to these scripts.