Protocol for conducting Real-time PCR (qPCR)
Step 1: Determine and isolate the DNA templates you wish to examine.
Step 2: Determine the genes you would like to amplify by reading various papers and journal articles. We selected HXT6, a hexose transporter, NDC1 (this was the control genomic's lab 2005 used), a nuclear envelope protein as our positive control, as it must be present, YMR279C, Mac's favorite protein, and BIO5. These genes were selected because we have reason to believe they may be deleted or duplicated in our mutant strains (grown under glucose limited conditions).
Step 3: Design PCR primers for each of these genes. For this step we suggest using the SGD database to find the sequence of the gene. Copy this sequence and paste it into Primer3. Primer3 will design several sets of PCR primers close to a desired melting range. It is important for you to save all of these sets of primers.
Step 4: Go through the primer pairs and determine the size of the PCR products you wish to produce. It is important to pick PCR products for each gene that are a minimum of 30 base pairs different in length, so that each PCR product has a different melting temperature. Primers should then be ordered. Our primers can be found below.
Genes |
Product Size(bp) |
Forward Primer (5' -> 3') |
Reverse Primer (5' -> 3') |
NDC1 |
117 |
GCATCCGTTGGGGATATTCT |
GGCTGTCCTTTGTGTTTGGA |
HXT6 |
165 |
TTTGCTTCCACCTTTGTTGG |
AGCACCCTTGGAAGATGGTT |
YMR279C |
292 |
TGATGGCATCTTTTCCCTTG |
CATGCGCCGATGAAACTAAT |
BIO5 |
237 |
TGCTCATGGGTCGGTATCTC |
ATCGTCAGAAGGGTCCTCGT |
Step 5. After recieving the primers it is important to test each primer pair, by conducting PCR. If correct PCR products results, the conditions used such as [Mg], Annealing Temp, etc., will then be used to run qPCR.
Step 6: Prepare to run Real-time PCR.
Directions for Using the Mx3000P qPCR Software
Step 1: Turn on Stratagene PCR machine.
Step 2: Open Mx3000P program.
Step 3: Select the experiment type. Explanation of each type of experiment can be located in the Mx3000p Manual. We selected SYBR Green for our experiment. Click OK.
Step 4: You will now enter a page with two main tabs (Plate Setup and Thermal Profile Setup). In the plate setup menu, you will name the contents of each well or tube. This will allow the program to keep track of each sample.
- To name a cell: Double click on the cell. The program will prompt you for the name of the cell and any additional comments.
- On the right hand side you will be allowed to select the type of well. There are several different types of wells. We will only use three types: NTC, no template control, unknown, for data, and Standard for comparison purposes. In our experiments the standards are wildtype, while the mutant strains are unknown.
- After selecting the type of well it is important that you specify how you would like to collect fluorescence data. If you are using SYBR green click the SYBR green box, if not click the corresponding location.
- For entering standard values you will need to choose a standard quantity for the well and the standard units. It is easiest when working with DNA to use nanograms.
After naming and formatting the cells, you will need to determine the PCR conditions with which you would like to run the PCR. You should have already tested each set of primers, and will use the same reaction conditions.
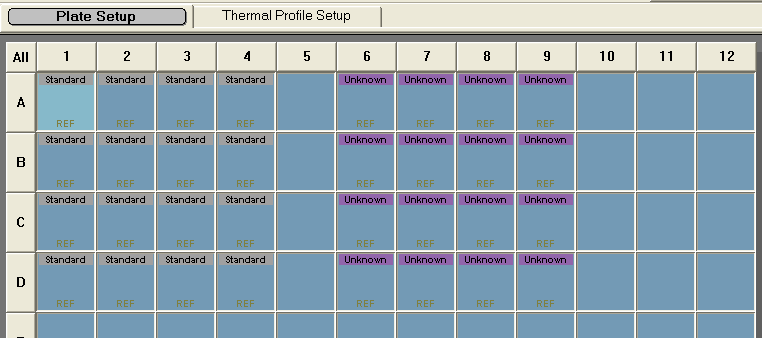
Figure 1. An image of the Plate Setup Tab.
Step 5: Click on the Thermal Profile Setup tab
Step 6: You will notice that there are 3 distinct Segments. Segment 1 is responsible for denaturing the DNA and should not be changed. Segment 2 should contain three separate plateaus and should be altered to meet your specified PCR conditions. This can be done by clicking and dragging each plateau to the desired temperature.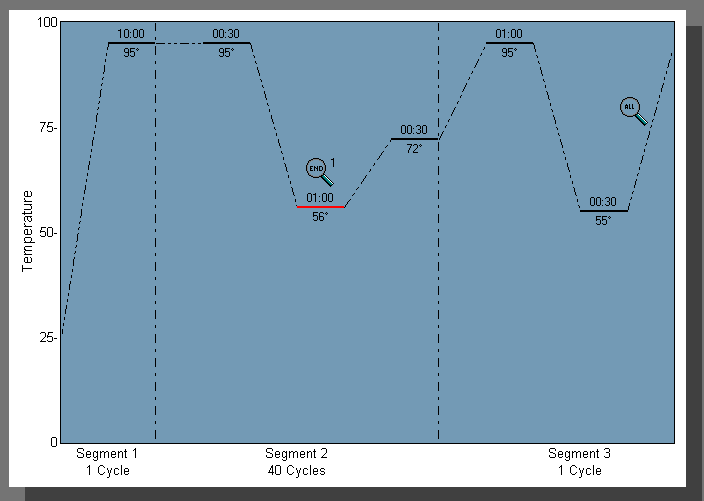
Figure 2. Thermal Setup Tab.
The third and final segment needs to be altered as well to correspond to the melting temperature of your primers. This segment will allow a disassociation curve to be produced. This curve will provide information about primer dimers.
Step 7: After the termal profile is set up properly, you are now ready to run qPCR. For any other concerns, one should consult the Mx3000p Manual.
References
Brown, J.B., Todd, K.M. Rosenzweig, R.F. (1998) Mol. Biol. Evol. 15(8): 931-942.
Ferea, T.L., Botstein, D., Brown, P.O., Rosenzweig, R.F. (1999) Proc. Natl. Acad. Sci. USA. 96: 9721-9726.